Dragon Design on a boys arm, we added some glitter to the design
Arabic Henna Design
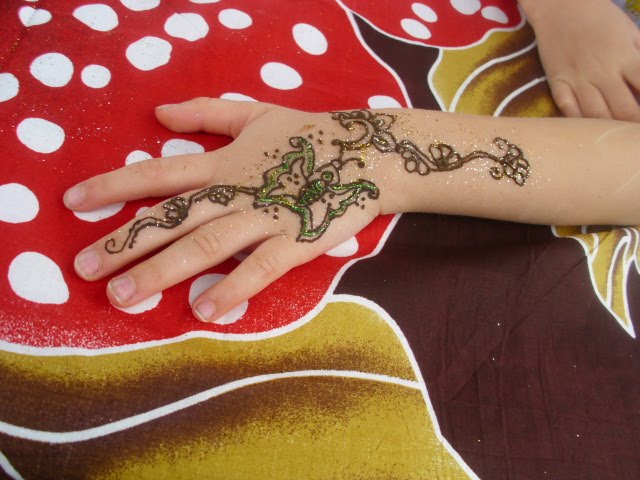
Lovely use of glitter by Shirley
A very detailed design, This lady wanted the henna applied all the way up her arm
Monday 14 June 2010
Another beautiful Arabic Design
Arabic designs consists of bold repeated patterns,
Henna Tattoo on the arm
This design will also look nice around the bellybutton
Simple Arabic Design
Simple Arabic Pattern
This pattern will look lovely on the wrist or even the back of the shoulder
Bridal Hand 1,
This design is an example of a bridal henna hand. Bridal henna is very intricate
In the Indian culture mehndi or henna painting is a very important part of the wedding ritual and ceremony. The women from both families get together and apply each others henna designs, although these days professional mehndi artist may be employed to adore the brides hands and feet.
It is said that the darker the henna design turns the more your mother in law will love you and the new bride does not do any household chores until the henna has worn of completely.
Saturday 12 June 2010
Henna can be for everyone, this is the top of a man's arm. I first done the outline and then coloured it in. When doing a design as bold as this you need to make sure that you leave no gaps in the coloring as it will show up when the henna dry's.
Here's one of my designs, hope you guys like it, it will look nice on the outside of the ankle or on top of your arm
There are many different ways of preparing a proper henna mixture for mehndi purposes, the following recipe makes approximately 15-20 simple designs like bracelets or anklets, here is a list of things the you will need:
Henna powder Fine cotton cloth Cello tape Cellophane Glass bowl Tea spoon Elastic band Henna oil or eucalyptus oil Scissors Lemon juice Tea-bags Cloves Cinnamon sticks Water
Firstly prepare the water mixture, boil some water with tea-bags, cloves and cinnamon sticks. Leave it to boil on low gas, the mixture is ready when the water has halved. Leave it to cool done and once it is at room temperature add in 2 table-spoons of lemon juice. This is best prepared the night before.
I always prefer to sieve the henna powder again as it will get rid of any leaves and air bubbles, I do this by putting the cotton cloth around the top of the bowl using an elastic band to hold it in place, then add in 3 table spoons of henna and sieve the powder through the cloth. You will be left with soft fine henna in the bowl.
The next step is to add in 2 table spoons of your tea mixture into in henna powder and using the back of the spoon press the mixture into the sides of the bowl, working to get the grittiness out of the paste, add in more tea mixture if needed. Keep mixing, the mixture henna paste should be similar to that of tooth-paste, firm yet soft.
Finally add in two tea-spoons of henna oil into the mixture.
Your henna is now ready to put into the cones
To make the cone you cut the cellophane into a rectangle about the size of your hand, not to big, holding one corner you start folding inwards to form the shape of a cone, hold this together with some cello-tape. Once done your cone is ready to be filled with the henna mixture. Just put in about 3 spoons of the henna mixture, do not fill it to the top, you can always use the mixture for another cone.
Fold the top of the cone inwards so that no henna can escape and tape in place. Your henna cone is now ready to make some lovely designs